使用过SpringSecurity Oauth2的小伙伴都知道,authorization_code、password、client_credentials、refresh_token几种授权模式获取token调用的接口都是/oauth/token,同时也都需要携带 client_id、client_secret 两个参数,或者说携带请求头
Authorization: Basic base64Encode(client_id_value:client_secret_value)这里的 Basic token 对应由 SpringSecurity 的过滤器 BasicAuthenticationFilter 进行验证处理。
1 BasicAuthenticationFilter
不同版本的springcloud中,doFilterInternal 的实现写法可能不同,但是核心逻辑是一样的。
了解 SpringSecurity 认证机制的小伙伴们看到下面的 authenticationManager.authenticate()方法就可以知道,这个过滤器用 client_id和client_secret 作为用户名和密码进行了一次认证,而对应的provider用来查询用户信息的实际就是ClientDetailsUserDetailsService。
在认证成功后将client的认证信息放在了SecurityContextHolder的线程变量中。
protected void doFilterInternal(HttpServletRequest request, HttpServletResponse response, FilterChain chain) throws IOException, ServletException { try { UsernamePasswordAuthenticationToken authRequest = this.authenticationConverter.convert(request); if (authRequest == null) { this.logger.trace("Did not process authentication request since failed to find username and password in Basic Authorization header"); chain.doFilter(request, response); return; } String username = authRequest.getName(); this.logger.trace(LogMessage.format("Found username '%s' in Basic Authorization header", username)); if (this.authenticationIsRequired(username)) { //核心代码 Authentication authResult = this.authenticationManager.authenticate(authRequest); SecurityContext context = SecurityContextHolder.createEmptyContext(); context.setAuthentication(authResult); SecurityContextHolder.setContext(context); if (this.logger.isDebugEnabled()) { this.logger.debug(LogMessage.format("Set SecurityContextHolder to %s", authResult)); } this.rememberMeServices.loginSuccess(request, response, authResult); this.onSuccessfulAuthentication(request, response, authResult); } } catch (AuthenticationException var8) { SecurityContextHolder.clearContext(); this.logger.debug("Failed to process authentication request", var8); this.rememberMeServices.loginFail(request, response); this.onUnsuccessfulAuthentication(request, response, var8); if (this.ignoreFailure) { chain.doFilter(request, response); } else { this.authenticationEntryPoint.commence(request, response, var8); } return; } chain.doFilter(request, response); }2 TokenEndpoint
与一般的认证流程略有不同,上面的 this.onSuccessfulAuthentication(request, response, authResult);是空实现,因此,认证成功后,过滤器就会放行,然后请求进入TokenEndpoint。
当我们看到下面的代码的@RequestMapping就知道,这里一定就是生成token的入口了。可能有部分小伙伴会疑惑,为什么TokenEndpoint的注解是@FrameworkEndpoint而不是@Controller,看到@Component也就恍然了。
@Component @Retention(RetentionPolicy.RUNTIME) @Target(ElementType.TYPE) public @interface FrameworkEndpoint { }postAccessToken()方法的入参有两个,parameters 比较好理解,就是request中的参数,而 principal 其实就是从 SecurityContextHolder线程变量拿到的上一步的认证信息
@FrameworkEndpoint public class TokenEndpoint extends AbstractEndpoint { ...... @RequestMapping( value = {"/oauth/token"},method = {RequestMethod.POST}) public ResponseEntity<OAuth2AccessToken> postAccessToken(Principal principal, @RequestParam Map<String, String> parameters) throws HttpRequestMethodNotSupportedException { if (!(principal instanceof Authentication)) { throw new InsufficientAuthenticationException("There is no client authentication. Try adding an appropriate authentication filter."); } else { String clientId = this.getClientId(principal); ClientDetails authenticatedClient = this.getClientDetailsService().loadClientByClientId(clientId); TokenRequest tokenRequest = this.getOAuth2RequestFactory().createTokenRequest(parameters, authenticatedClient); if (clientId != null && !clientId.equals("") && !clientId.equals(tokenRequest.getClientId())) { throw new InvalidClientException("Given client ID does not match authenticated client"); } else { if (authenticatedClient != null) { this.oAuth2RequestValidator.validateScope(tokenRequest, authenticatedClient); } if (!StringUtils.hasText(tokenRequest.getGrantType())) { throw new InvalidRequestException("Missing grant type"); } else if (tokenRequest.getGrantType().equals("implicit")) { //这里不支持implicit模式获取token throw new InvalidGrantException("Implicit grant type not supported from token endpoint"); } else { if (this.isAuthCodeRequest(parameters) && !tokenRequest.getScope().isEmpty()) { this.logger.debug("Clearing scope of incoming token request"); tokenRequest.setScope(Collections.emptySet()); } if (this.isRefreshTokenRequest(parameters)) { tokenRequest.setScope(OAuth2Utils.parseParameterList((String)parameters.get("scope"))); } OAuth2AccessToken token = this.getTokenGranter().grant(tokenRequest.getGrantType(), tokenRequest); if (token == null) { throw new UnsupportedGrantTypeException("Unsupported grant type: " + tokenRequest.getGrantType()); } else { return this.getResponse(token); } } } } } ...... }抛开校验逻辑,这段代码比较重要的就是下面几行。
1、首先查询了客户端信息(对应的数据库表就是oauth_client_details)
2、接下来用客户端信息和request中的参数构建了一个TokenRequest对象,
3、最后以tokenRequest作为参数,生成了我们最终需要的token.
显然,这里最重要的部分就是this.getTokenGranter().grant()方法
...... ClientDetails authenticatedClient = this.getClientDetailsService().loadClientByClientId(clientId); TokenRequest tokenRequest = this.getOAuth2RequestFactory().createTokenRequest(parameters, authenticatedClient); ...... OAuth2AccessToken token = this.getTokenGranter().grant(tokenRequest.getGrantType(), tokenRequest);关于TokenRequest,我们通过它的构造器基本上就可以了解这个对象包含了哪些属性。
public TokenRequest(Map<String, String> requestParameters, String clientId, Collection<String> scope, String grantType) { this.setClientId(clientId); this.setRequestParameters(requestParameters); this.setScope(scope); this.grantType = grantType; }而对于 this.getTokenGranter(),它的具体实现是在AuthorizationServerEndpointsConfigurer#tokenGranter()方法,那么接下来的重点源码就是AuthorizationServerEndpointsConfigurer类了。
至于为什么具体实现是上面这个方法,可以看TokenEndpoint 实例在初始化时的设置。 在AuthorizationServerEndpointsConfiguration.java 有这样一段代码。(有一点我不太明白,@Bean 和 @Componet 都是将bean注册到spring容器中,为什么可以同时存在)
@Bean public TokenEndpoint tokenEndpoint() throws Exception { TokenEndpoint tokenEndpoint = new TokenEndpoint(); tokenEndpoint.setClientDetailsService(clientDetailsService); tokenEndpoint.setProviderExceptionHandler(exceptionTranslator()); tokenEndpoint.setTokenGranter(tokenGranter());//设置token生成器 tokenEndpoint.setOAuth2RequestFactory(oauth2RequestFactory()); tokenEndpoint.setOAuth2RequestValidator(oauth2RequestValidator()); tokenEndpoint.setAllowedRequestMethods(allowedTokenEndpointRequestMethods()); return tokenEndpoint; }3 AuthorizationServerEndpointsConfigurer
SpringSecurity实现OAuth2分为两个服务,Authorization Server和Resource Server分别作为授权服务器和资源服务器,我们在配置授权服务器的时候会有如下配置。显然这里的配置就是为了生成token使用的。
@Override public void configure(AuthorizationServerEndpointsConfigurer endpoints) throws Exception { endpoints .pathMapping("/oauth/token","/clonetx/token") .allowedTokenEndpointRequestMethods(HttpMethod.GET, HttpMethod.POST)//允许的请求方式 //tokenStore默认内存存储,重启服务token就会失效 .tokenStore(new InMemoryTokenStore()) //.accessTokenConverter(jwtAccessTokenConverter()) //用于配置密码式的授权方式,如果不设置,密码模式请求token是,token为null,TokenEndpoint会提示不支持password授权模式 //其实这里配置就是parent AuthenticationManager //.authenticationManager(authenticationManager()) /*.tokenGranter(new TokenGranter() { @Override public OAuth2AccessToken grant(String s, TokenRequest tokenRequest) { return null; } })*/ ; }在分析this.getTokenGranter().grant()方法的源码之前,我们先看下 TokenGranter 的类图。
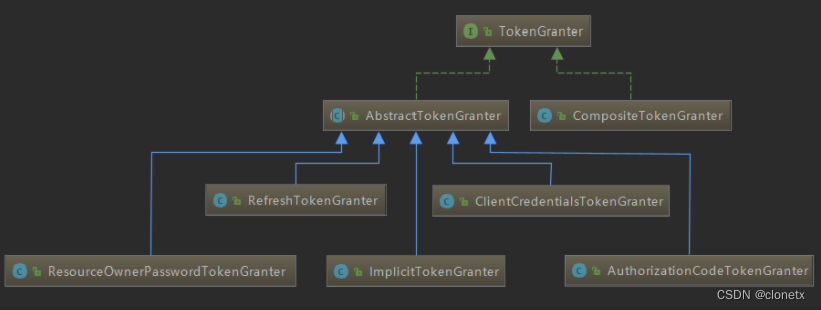 通过类图,能够清晰的看到,TokenGranter 有6个实现类,其中通过名称我们就能知道,其中5个实现类分别对应refresh_token、client_credentials、password、authorization_code、implicit几种grantType。(其中implicit模式不由/oauth/token处理,具体可以看上面略过的校验逻辑,这里不进行展开)。
我们带着剩下的 CompositeTokenGranter 实现类来看下面这段代码,可以知道,如果配置AuthorizationServerEndpointsConfigurer endpoints的时侯没有指定token生成器,那么默认就会使用 CompositeTokenGranter
private TokenGranter tokenGranter() { if (tokenGranter == null) { tokenGranter = new TokenGranter() { private CompositeTokenGranter delegate; @Override public OAuth2AccessToken grant(String grantType, TokenRequest tokenRequest) { if (delegate == null) { // 获取 oauth2 的 5 种 token 生成器 delegate = new CompositeTokenGranter(getDefaultTokenGranters()); } // 把auth2 的 5 种 token 生成器遍历了一次,根据grantType 选择对应的生成器,都不满足的就返回空 return delegate.grant(grantType, tokenRequest); } }; } return tokenGranter; }显然,CompositeTokenGranter是那 5 种 token 生成器的代理类,根据 grantType 来选择对应的生成器,并通过代理对象的grant()方法生成token。(这里我们需要关注一下 tokenServices() 方法,后面生成token的逻辑就在它的实现代码中。可以发现endpoints配置中没有指定就会默认DefaultTokenServices,当然对于其它配置也是一样的,不在endpoints配置中指定就会取默认的,这里就不展开说明了)
private List<TokenGranter> getDefaultTokenGranters() { ClientDetailsService clientDetails = clientDetailsService(); //设置了产生token的service AuthorizationServerTokenServices tokenServices = tokenServices(); AuthorizationCodeServices authorizationCodeServices = authorizationCodeServices(); OAuth2RequestFactory requestFactory = requestFactory(); //token 生成器 List<TokenGranter> tokenGranters = new ArrayList<TokenGranter>(); //N# 1 授权码模式token生成器 tokenGranters.add(new AuthorizationCodeTokenGranter(tokenServices, authorizationCodeServices, clientDetails, requestFactory)); //N# 2 刷新token 生成器 tokenGranters.add(new RefreshTokenGranter(tokenServices, clientDetails, requestFactory)); //N# 3 隐藏式生成器 ImplicitTokenGranter implicit = new ImplicitTokenGranter(tokenServices, clientDetails, requestFactory); tokenGranters.add(implicit); //N# 4 客户端模式生成器 tokenGranters.add(new ClientCredentialsTokenGranter(tokenServices, clientDetails, requestFactory)); if (authenticationManager != null) {//密码模式要求自定义一个authenticationManager parent //N# 5 密码式生成器 tokenGranters.add(new ResourceOwnerPasswordTokenGranter(authenticationManager, tokenServices, clientDetails, requestFactory)); } return tokenGranters; } private AuthorizationServerTokenServices tokenServices() { if (tokenServices != null) { return tokenServices; } this.tokenServices = createDefaultTokenServices(); return tokenServices; } private DefaultTokenServices createDefaultTokenServices() { DefaultTokenServices tokenServices = new DefaultTokenServices(); tokenServices.setTokenStore(tokenStore()); tokenServices.setSupportRefreshToken(true); tokenServices.setReuseRefreshToken(reuseRefreshToken); tokenServices.setClientDetailsService(clientDetailsService()); tokenServices.setTokenEnhancer(tokenEnhancer());//token增强器 addUserDetailsService(tokenServices, this.userDetailsService); return tokenServices; }继续跟踪 delegate.grant() 方法,我们会发现,无论是无论是哪种授权模式,都会调用 AbstractTokenGranter中的grant方法。
4 AbstractTokenGranter
下面代码中的tokenServices 在 getDefaultTokenGranters()#tokenServices() 方法中已经指定,没指定默认就是DefaultTokenServices。
public OAuth2AccessToken grant(String grantType, TokenRequest tokenRequest) { if (!this.grantType.equals(grantType)) { return null; } else { String clientId = tokenRequest.getClientId(); ClientDetails client = this.clientDetailsService.loadClientByClientId(clientId); this.validateGrantType(grantType, client); this.logger.debug("Getting access token for: " + clientId); return this.getAccessToken(client, tokenRequest); } } protected OAuth2AccessToken getAccessToken(ClientDetails client, TokenRequest tokenRequest) { return this.tokenServices.createAccessToken(this.getOAuth2Authentication(client, tokenRequest)); } //这里RefreshTokenGranter是个例外,重写了getAccessToken 方法 //@Override //protected OAuth2AccessToken getAccessToken(ClientDetails client, TokenRequest tokenRequest) { // String refreshToken = tokenRequest.getRequestParameters().get("refresh_token"); // return getTokenServices().refreshAccessToken(refreshToken, tokenRequest); //}5 DefaultTokenServices
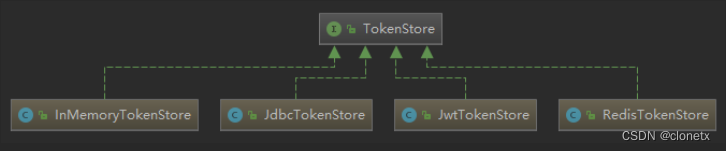
分析这段代码,首先是尝试从 tokenStore 中获取token,简单看一下TokenStore的部分实现类,就能推测出不同的实现类其实就是把token存放在不同的地方,默认是内存中,也是可以在endpoints配置的。
那么这段逻辑就是,判断一下是否已经为这个authentication生成过token,如果已经存在token,判断是否已经过期,没过期就返回这个token;否则就把 refreshToken 和 existingAccessToken从存储中先清理掉。
然后在来判断 refreshToken,如果不存在,说明以前没认证过,那就先生成一个refreshToken,如果存在但是过期了,也重新生成一个refreshToken。
最后就是利用 refreshToken 和 authentication重新生成一个accessToken了。然后再把新的token放到存储中。
@Transactional public OAuth2AccessToken createAccessToken(OAuth2Authentication authentication) throws AuthenticationException { OAuth2AccessToken existingAccessToken = this.tokenStore.getAccessToken(authentication); OAuth2RefreshToken refreshToken = null; if (existingAccessToken != null) { if (!existingAccessToken.isExpired()) { this.tokenStore.storeAccessToken(existingAccessToken, authentication); return existingAccessToken; } if (existingAccessToken.getRefreshToken() != null) { refreshToken = existingAccessToken.getRefreshToken(); this.tokenStore.removeRefreshToken(refreshToken); } this.tokenStore.removeAccessToken(existingAccessToken); } if (refreshToken == null) { refreshToken = this.createRefreshToken(authentication); } else if (refreshToken instanceof ExpiringOAuth2RefreshToken) { ExpiringOAuth2RefreshToken expiring = (ExpiringOAuth2RefreshToken)refreshToken; if (System.currentTimeMillis() > expiring.getExpiration().getTime()) { refreshToken = this.createRefreshToken(authentication); } } OAuth2AccessToken accessToken = this.createAccessToken(authentication, refreshToken); this.tokenStore.storeAccessToken(accessToken, authentication); refreshToken = accessToken.getRefreshToken(); if (refreshToken != null) { this.tokenStore.storeRefreshToken(refreshToken, authentication); }到这里我们终于一层层的揭开了SpringSecurity Oauth2令牌生成的面纱,上面我们在注释中有提到过RefreshTokenGranter是个例外,它重写了getAccessToken 方法,但最终的实现也是调用的下面代码。
private OAuth2AccessToken createAccessToken(OAuth2Authentication authentication, OAuth2RefreshToken refreshToken) { DefaultOAuth2AccessToken token = new DefaultOAuth2AccessToken(UUID.randomUUID().toString()); int validitySeconds = getAccessTokenValiditySeconds(authentication.getOAuth2Request()); if (validitySeconds > 0) { token.setExpiration(new Date(System.currentTimeMillis() + (validitySeconds * 1000L))); } token.setRefreshToken(refreshToken); token.setScope(authentication.getOAuth2Request().getScope()); return accessTokenEnhancer != null ? accessTokenEnhancer.enhance(token, authentication) :我们看到accessToken原来就是个uuid。
客户端授权模式token例子 { "access_token": "b1394c16-0b9a-4101-b0ba-9237dbeb27ae", "token_type": "bearer", "expires_in": 1526, "scope": "test" }不过到这并没完,还有一个扎眼的 accessTokenEnhancer.enhance(token, authentication)方法。我们上文在createDefaultTokenServices()的代码中,看到初始化tokenServices时设置了一个TokenEnhancer,见名知意,它可以对 token 进行额外的处理。这就不得不提到 JWT了,我们下次开一篇单独分析TokenEnhancer。
热门文章
- 动物疫苗贵吗知乎文章(动物疫苗包括哪些)
- 动物医院收费标准最新表格图(动物医院看病多少钱)
- 开个宠物店大概需要多少钱(现在开宠物店前景好吗)
- 宠物粮食在哪里进货好呢知乎(宠物粮在哪里批发)
- 4月11日18.4M/S|Clash/Shadowrocket/SSR/V2ray免费节点每天更新链接地址,便宜机场推荐
- 普通狗粮多少钱一斤(狗粮多少钱一斤算好)
- 宠物医院给仓鼠看病要钱吗(宠物医院治仓鼠贵不贵)
- 办理动物诊疗许可证需要什么材料呢(动物诊疗许可证办理流程)
- 猫粮利润率多少合理(猫粮的利润率)
- 4月17日21.9M/S|SSR/Shadowrocket/Clash/V2ray免费节点每天更新链接地址,便宜机场推荐